Friday, February 25, 2022

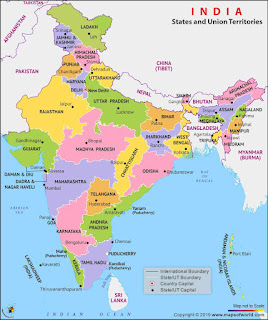
India State List in Select HTML Tag
 India State List in Select HTML Tag

India Map


<code> <!DOCTYPE html>
<html lang="en">
<head>
<title>Bootstrap Example</title>
<meta charset="utf-8">
<meta name="viewport" content="width=device-width, initial-scale=1">
<link rel="stylesheet" href="https://maxcdn.bootstrapcdn.com/bootstrap/3.4.1/css/bootstrap.min.css">
<script src="https://ajax.googleapis.com/ajax/libs/jquery/3.5.1/jquery.min.js"></script>
<script src="https://maxcdn.bootstrapcdn.com/bootstrap/3.4.1/js/bootstrap.min.js"></script>
</head>
<body>

<div class="container">
<h2>Well</h2>
<div class="well">
<div class="form-group mb-5">
<label class="control-label col-sm-2" for="state">Select State:</label>
<div class="col-sm-10 mb-5">

<select name="state" class="form-control" id="CollegeState">
<option value="">All India State List</option>
<option value="Andhra Pradesh">Andhra Pradesh</option>
<option value="Chhattisgarh">Chhattisgarh</option>
<option value="Delhi">Delhi</option>
<option value="Goa">Goa</option>
<option value="Gujarat">Gujarat</option>
<option value="Haryana">Haryana</option>
<option value="Himachal Pradesh">Himachal Pradesh</option>
<option value="Jharkhand">Jharkhand</option>
<option value="Karnataka">Karnataka</option>
<option value="Madhya Pradesh">Madhya Pradesh</option>
<option value="Maharashtra">Maharashtra</option>
<option value="Manipur">Manipur</option>
<option value="Orissa">Orissa</option>
<option value="Puducherry">Puducherry / Pondich</option>
<option value="Pune">Pune</option>
<option value="Rajasthan">Rajasthan</option>
<option value="Sikkim">Sikkim</option>
<option value="Tamil Nadu">Tamil Nadu</option>
<option value="Uttar Pradesh">Uttar Pradesh</option>
<option value="Uttarakhand">Uttarakhand / Uttara</option>
<option value="West Bengal">West Bengal</option>
</select>

</div>
</div>

</form>
<br>
<br>
</div>
</div>

</body>
</html>
</code>

Sunday, October 3, 2021

Disable XDG Popup In chrome URL like what's app api link


                                              How To Disable Any URL in XDG Popup


sudo mkdir -p /etc/opt/chrome/policies/managed/ && echo '{ "URLWhitelist": ["whatsapp://*"] }' |sudo tee /etc/opt/chrome/policies/managed/whitelist.json


Wednesday, May 19, 2021

How to Update Composer 2.0 in Ubuntu 20.04 ?

 How to Update Composer in Ubuntu 20.04 ?


Important Steps to update Composer 2.0:


1. Open Ubnutu Terminal by using CTRL+ ALT+ T

2. $ cd ~ 

3. $ curl -sS https://getcomposer.org/installer -o composer-setup.php

4. To install composer globally, use the following command which will download and install Composer as a system-wide command named composer, under /usr/local/bin:

 $ sudo php composer-setup.php --install-dir=/usr/local/bin --filename=composer

Check updated version of composer

How to Update Composer 2.0 in Ubuntu 20.04


Conclusion


Now we can see above how to update composer

Also Provide

GST billing software

Stock Management software

Mobile application development

Payment Gateway Integration(core PHP, Laravel and Python)


Saturday, January 9, 2021

Lead Management System(LMS) Software Online

 Lead Management System Software Online

Lead Management System(LMS) Software Online


Our Leads Management System(LMS) Features

1. Admin login

2. Telecaller registration

3. Update Excel Data

4. Assign data to all telecallers in a very short time

5. Daily report

6. Previous history record


Lead Auto
The biggest benefit of any lead management software online is the automatic alloted of the leads. This system allots and forwards the leads to the user login inbox from where the distribution and assignment takes place.

Lead Assignment
There are various departments in any industry. You need specialists to handle each job. The lead management system makes your job of assigning the leads to the right person an easy job.

Lead Prioritization
It is very important to rank your leads in order of their quality. The lead management system programs do this process based on the sales readiness of the leads. This can help you to focus on the right leads.

Lead Plan
Plan your leads activities is important in order to convert them into sales. This online software plans your follow up calls.

Lead Report and Tracking
In this system we provide accurate reports of each lead.

Save your valuable Time
This lead management system is not different in any way. You have the facility of programming the automation of the routine tasks thereby leaving you with more time to pursue the leads and convert them into an actual business.


Conclusion

Any lead management online system should be compatible with other software systems. This integration is very important for successful conversion of leads into business.
Now maintain your leads in a very easy process.

Also Provide

GST billing software

Stock Management software

Mobile application development

Payment Gateway Integration(core PHP, Laravel and Python)


Prime Programmer

    8795202855

Prime Programmer


Thursday, September 24, 2020

Steps To Integrate Easebuzz Payment Gateway Using Core PHP


Steps To Integrate Easebuzz Payment Gateway Using Core PHP

Steps to integrate Easebuzz payment gateway by using Core PHP

Pay with Easebuzz is a payment gateway aggregator who offers an electronic payment service for any merchant website irrespective of their backend technology. 

How To get Easebuzz Payment Gateway


1. Sign up on easebuzz and upload your required documents.
2. Request for test credentials and integrate payment gateway.
3. Change credentials to production and start collecting payments online.
4. You can also use your Easebuzz account to also receive payments by creating links, or Easepay. 

Integration proccess using Core PHP


1. After downloaded payment gateway kit copy and paste easebuzz-lib folder in your's project directory.

2. Create Two PHP files easebuzz.php and response.php 

3. Than include "include_once('easebuzz-lib/easebuzz_payment_gateway.php'); " in easebuzz.php file.

4. Next Set Environment $MERCHANT_KEY, $SALT and $ENV.
          $MERCHANT_KEY = "11PKP71CDZ3";
          $SALT = "DEF78E8IXY";         
          $ENV = "test";   // set enviroment name

5. create Easebuzz class object and pass $MERCHANT_KEY, $SALT and $ENV.
            $easebuzzObj = new Easebuzz($MERCHANT_KEY, $SALT, $ENV);


6. call Easebuzz class methods and function based on your's requirements.
       a). Initiate Payment API POST Format and call initiatePaymentAPI

    $postData = array ( 
        "txnid" => "T3SAT0B5OL", 
        "amount" => "100.0", 
        "firstname" => "jitendra", 
        "email" => "test@gmail.com", 
        "phone" => "1231231235", 
        "productinfo" => "Laptop", 
        "surl" => "http://localhost:3000/response.php", 
        "furl" => "http://localhost:3000/response.php", 
        "udf1" => "aaaa", 
        "udf2" => "aaaa", 
        "udf3" => "aaaa", 
        "udf4" => "aaaa", 
        "udf5" => "aaaa", 
        "address1" => "aaaa", 
        "address2" => "aaaa", 
        "city" => "aaaa", 
        "state" => "aaaa", 
        "country" => "aaaa", 
        "zipcode" => "123123" 
    );

    $easebuzzObj->initiatePaymentAPI($postData);    

  b). Transaction API POST Format and call transaction API

    $postData = array ( 
        "txnid" => "TZIF0SS24C",
        "amount" => "1.03",
        "email" => "test@gmail.com",
        "phone" => "1231231235"
    );

    $result = $easebuzzObj->transactionAPI($postData); 

7. Process is completed.

Conclusion

So we can see how to integrate easebuzz payment gateway.


Please let us know if you are facing any issue while payment.

Also Provide

GST billing software

Stock Management software

Mobile application development

Payment Gateway Integration(core PHP, Laravel and Python)


Prime Programmer

    8795202855

Prime Programmer


Monday, September 21, 2020

Steps To Integrate ICICI Bankonnect Payment Gateway In Core PHP

Steps To Integrate ICICI Bankonnect Payment Gateway In Core PHP


Steps To Integrate ICICI Bankonnect Payment Gateway In Core PHP

Bank open is an new system to collect payment via PHP Technology. Following are the steps:


PG Sandbox APIs for Bankonnect PG.


Step 1:  After Signup, the merchant can go on Bankonnect.co and generate the Sandbox Keys from the tab - Integration - Payment Gateways

Step 2: Go to docs.bankopen.com and  For generating the Request Signature, please refer to the documentation, https://docs.bankopen.com/docs/authentication,  "Authentication" and follow the steps for "Authorization header" which will be required for creating Payment token and once completed  go to "Payment Gateway" click on "Layer" and then click on “Layer Checkout” for the integration.  The Authorization header would be 'bearer ACCESS_KEY:REQUEST SIGNATURE'.  


Step 4: Create HTML Form

Make Donation Online

1. Name

2. Email

3. Mobile number

4. Amount


Step 5: Payment accept Page

 _do_post(

      $payment_token['create']['route'],

      [

        'customer_name' => $name,

        'amount' => $amount,

        'currency'  => 'INR',

        'mtx' => date('ymdhis'),//merchant-reference-number

        'email_id' => $email,

        'contact_number' => $mobile

      ]

    );

?>


"; print_r($http->get_last_http_error()); echo "

";

    print_r($exception->getMessage());

  }

}

?>


Step 6: Response Received


_do_get(

        sprintf($payment_token['status']['route'], $payment_token_id)

    );


    $data['data'] = json_decode(json_encode($payment_token_data), true);

    $data['time'] = date('d-m-Y: H:i:s');


    $inp = file_get_contents('response.json');


    $tempArray = json_decode($inp);

    array_push($tempArray, $data);

    $jsonData = json_encode($tempArray);

    file_put_contents('response.json', $jsonData);

} catch (Exception $exception) {


    echo "

";

    print_r($http->get_last_http_error());

    echo "

";

    print_r($exception->getMessage());

} ?>

Thanks for payment


Payment Status: Success                   


Transaction Number:Z_UDFjsKL  


conclusion:

So we have seen simple example how to integrate payment gateway using PHP technology. If you are facing any issue please contact

Other Payment Gatway Integration also Available

1. Paytm Payment Gateway Integration in PHP

2. Razorpay Payment Gateway Integration in PHP

3. Bankonnect Payment Gateway Integration in Android App or Mobile App

4. Instamojo Payment Gateway Integration in PHP

5. Easebuzz Payment Gateway Integration in PHP

6. ENACH API Integration in PHP


For Integration kindly mail: mahendra@primeprogrammer.com

Also Provide

GST billing software

Stock Management software

Mobile application development

Payment Gateway Integration(core PHP, Laravel and Python)


Prime Programmer

    8795202855

Prime Programmer


Wednesday, August 19, 2020

Payment Gateway Integration Service in PHP

 Payment Gateway Integration Services India-8795202855


Payment Gateway Integration Services In PHP

Payment Gateway Integration Services provided by Prime Programmer. We provide services for all types of eCommerce and Non eCommerce Websites based on PHP technology. Our Integration services includes all support you need to integrate payment gateway into your website or Mobile(Android)application and make it live (From bank end to your website/application end.

Payment Gateway Services For websites or mobile application and both offering e-commerce services to its clients, integrating a Cheapest payment gateway with their site is a basic necessity. While choosing the right gateway is more important, ensuring proper payment gateway integration is equally significant to ensure smooth online transactions for your customers. With Prime Programmer, you can get the most Reliable and Affordable Best Payment Gateways Integration services for Business in India that will help enhance the feeling of trust amongst your customers. We make sure that the payment gateway you choose offers a fast and safe point of payment that is easy to use for online customers. We are capable of integrating your website with almost any type of payment gateway in a convenient manner.

List of payment gateway integration in PHP and Framework(Laravel, Cakephp, CI And Android application)

1.  Paypal  
2.  Citrus payment gateway
3.  Authorized.Net 
4.  ICICI Bank
5.  Bankonnect(Bank Open)
6.  Razorpay
7.  Paytm
8.  Ccavenue
9.  PayU Money
10. ZooZ payment gateway
11. NMI
12. ENACH API Integration(paynimo)
13. E Mandate 

Conclusion

Now we understand prime programmer provide above service and also capable to integrate above listed payment gateways


Also Provide

GST billing software

Stock Management software

Mobile application development

Payment Gateway Integration(core PHP, Laravel and Python)


Prime Programmer

    8795202855

Prime Programmer


Saturday, August 1, 2020

Steps to Integrate Razorpay payment gateway in php

Steps to integrate Razorpay payment gateway in php

Razorpay payment gateway integration in PHP


Steps to integrate Razorpay payment gateway in php


How to integrate Razor Payment Gateway in website ?


After all process have completed by Razorpay. 

"Congratulations! Your Razorpay account has been activated." has been received

Your will received sandbox payment gateway kit. Which have Key ID and Key secret . these are testing credentails

$keyId = 'rzp_test_ZBXX7X5mcPzHGT';
$keySecret = 'yVKkje2aIBCALubM98dLuxv9';

Automatic Checkout

<meta name="viewport" content="width=device-width">
<form action="/purchase" method="POST">
<!-- Note that the amount is in paise = 50 INR -->
<script
    src="https://checkout.razorpay.com/v1/checkout.js"
    data-key="<YOUR_KEY_ID>"
    data-amount="50000"
    data-buttontext="Pay with TechHawa"
    data-name="Merchant Name"
    data-description="Purchase Description"
    data-image="https://your-awesome-site.com/your_logo.jpg"
    data-prefill.name="TechHawa"
    data-prefill.email="contact@techhawa.com"
    data-theme.color="#F37254"
></script>
<input type="hidden" value="Hidden Element" name="hidden">
</form>


Step 2 Create order from server

$order  = $client->order->create([  'receipt'         => 'order_rcptid_11',  'amount'          => 500, // amount in the smallest currency unit  'currency'        => 'INR',// <a href="/docs/payment-gateway/payments/international-payments/#supported-currencies" target="_blank">See the list of supported currencies</a>.)  'payment_capture' =>  '0']);


Manual order

<button id="rzp-button1">Pay</button><script src="https://checkout.razorpay.com/v1/checkout.js"></script><script>var options = {    "key": "YOUR_KEY_ID", // Enter the Key ID generated from the Dashboard    "amount": "50000", // Amount is in currency subunits. Default currency is INR. Hence, 50000 refers to 50000 paise    "currency": "INR", "name": "Acme Corp",    "description": "Test Transaction",    "image": "https://example.com/your_logo", "order_id": "order_9A33XWu170gUtm", //This is a sample Order ID. Pass the `id` obtained in the response of Step 1    "handler": function (response){        alert(response.razorpay_payment_id); alert(response.razorpay_order_id); alert(response.razorpay_signature)    },    "prefill": {        "name": "Gaurav Kumar",        "email": "gaurav.kumar@example.com", "contact": "9999999999"    },    "notes": {        "address": "Razorpay Corporate Office"    },    "theme": {        "color": "#F37254"    }};var rzp1 = new Razorpay(options);document.getElementById('rzp-button1').onclick = function(e){    rzp1.open();    e.preventDefault();}</script>


Testing Card

Card Network

Domestic / International

Card Number

Mastercard

Domestic

5104 0155 5555 5558
5104 0600 0000 0008

Visa

Domestic

4111 1111 1111 1111

Mastercard

International

5555 5555 5555 4444
5105 1051 0510 5100

Visa

International

4012 8888 8888 1881
4000 1841 8621 8826


Step 

Generate Signature of your website server


generated_signature = hmac_sha256(razorpay_order_id + "|" +
razorpay_payment_id, secret); if (generated_signature == razorpay_signature) { payment is successful }


use Razorpay\Api\Api;$api = new Api($api_key, $api_secret);
$attrbutes  = array(‘razorpay_signature’  => ‘23233’,  
‘razorpay_payment_id’  => ‘332’ ,  ‘razorpay_order_id’ => ‘12122’);
$order  = $api->utility->verifyPaymentSignature($attributes)


Conclusion:


As we have seen above razorpay payment gateway integration in php is quite simple

This proccess is also compatible with Laravel, Codeigniter and Cakephp

We have also provide integration in Android Mobile App(Java)

Please let me know if you have any query

Mahendra K Mishra
8795292855

Also Provide

GST billing software

Stock Management software

Mobile application development

Payment Gateway Integration(core PHP, Laravel and Python)


Prime Programmer

    8795202855

Prime Programmer


Tuesday, July 28, 2020

Visual Studio Not open in Ubuntu 20.04


Ubuntu 20.04 /var/lib/snapd has 'other' write 40777

Happened to me also. I changed the permissions of /var/lib/snapd from 777 to 755, so just do:

sudo chmod -R 0755 /var/lib/snapd


Also Provide

GST billing software

Stock Management software

Mobile application development

Payment Gateway Integration(core PHP, Laravel and Python)


Sunday, July 26, 2020

Configure Virtual Host apache2 In Ubuntu 20.04

Configure Virtual Host  apache2 In Ubuntu 20.04


Configure Virtual Host  apache2 In Ubuntu 20.04


Do after successfull installation of LAMP

Step 1: Create web diretory of each virtual host

sudo mkdir -p /var/www/primeprogrammer.com/


Step 2: Change ownership from root to current user

$ sudo chown -R $USER:$USER /var/www/primeprogrammer.com/

Step 3: Set read permission to the Apache root directory i.e /var/www/  using command in terminal

$ sudo chmod -R 755 /var/www/

Step 4: Create demo page for host

$ sudo vi /var/www/primeprogrammer.com/index.html

<html>
 <head>
 <title>www.primeprogrammer.com</title>
 </head>
 <body>
 <h1>Hello, This is a test page for primeprogrammer.com website</h1>
 </body>
</html>

Save & Close file.

Step 5:  Create configuration file for your host (primeprogrammer.com)

$ sudo cp /etc/apache2/sites-available/000-default.conf /etc/apache2/sites-available/primeprogrammer.com.conf

Becareful that you must save all configuration files with .conf extension at the end, otherwise it will not work.

Now update in changes in *.conf file

<VirtualHost *:80>
 # The ServerName directive sets the request scheme, hostname and port that
 # the server uses to identify itself. This is used when creating
 # redirection URLs. In the context of virtual hosts, the ServerName
 # specifies what hostname must appear in the request's Host: header to
 # match this virtual host. For the default virtual host (this file) this
 # value is not decisive as it is used as a last resort host regardless.
 # However, you must set it for any further virtual host explicitly.
 #ServerName www.example.com

   ServerAdmin webmaster@primeprogrammer.com
   ServerName primeprogrammer.com
   ServerAlias www.ostechnix1.lan
   DocumentRoot /var/www/primeprogrammer.com

# Available loglevels: trace8, ..., trace1, debug, info, notice, warn,
 # error, crit, alert, emerg.
 # It is also possible to configure the loglevel for particular
 # modules, e.g.
 #LogLevel info ssl:warn

ErrorLog ${APACHE_LOG_DIR}/error.log
 CustomLog ${APACHE_LOG_DIR}/access.log combined

# For most configuration files from conf-available/, which are
 # enabled or disabled at a global level, it is possible to
 # include a line for only one particular virtual host. For example the
 # following line enables the CGI configuration for this host only
 # after it has been globally disabled with "a2disconf".
 #Include conf-available/serve-cgi-bin.conf
</VirtualHost>

Save & Close


Step 6:  Disable default virtual host

$ sudo a2dissite 000-default.conf

Step 7:  Enable your configured virtaul host

$ sudo a2ensite primeprogrammer.com.conf

Step 8: Test configured virtual host

$ sudo apache2ctl configtest

if all is ok shows below message

AH00558: apache2: Could not reliably determine the server's fully qualified domain name, using 127.0.1.1. Set the 'ServerName' directive globally to suppress this message
Syntax OK


Step 9: Configure defined site to hosts file

$ sudo vi /etc/hosts

[.....]
127.0.0.1     primeprogrammer.com
[.....] 


Step 10: Restart your apache2 server

$ sudo systemctl restart apache2

That's it.

Finally, open your installed browser and hit below url:

http://primeprogrammer.com

Other Service also provide

Let me know if you have any query.

Thanks
8795202855
Prime Programmer


Thursday, July 23, 2020

Prime Programmer

Prime Programmer: Prime Programmer offers an IT solutions to improve your business.We works with clients to develop the best possible IT solution for their company.

Monday, July 20, 2020

Steps To Integrate Bankonnect Co Payment Gateway (ICICI Bank) in Android(Mobile) App

Steps To Integrate Bankonnect Co Payment Gateway (ICICI Bank) in Android(Mobile) App


Steps To Integrate Bankonnect Co Payment Gateway (ICICI Bank) in Android(Mobile) App

Bank open is an new system to collect payment via android app. Following are the steps:


PG Sandbox APIs for Bankonnect PG.

Step 1:  After Signup, the merchant can go on Bankonnect.co and generate the Sandbox Keys from the tab - Integration - Payment Gateways


Step 2: Go to docs.bankopen.com and  For generating the Request Signature, please refer to the documentation, https://docs.bankopen.com/docs/authentication,  "Authentication" and follow the steps for "Authorization header" which will be required for creating Payment token and once completed  go to "Payment Gateway" click on "Layer" and then click on “Layer Checkout” for the integration.  The Authorization header would be 'bearer ACCESS_KEY:REQUEST SIGNATURE'.  


Step 3: Once you click on Layer Checkout - you can start integrating "Layer.js" to creating the payment token, please refer to the documentation, https://docs.bankopen.com/reference#generate-token. The sandbox API for generating the payment token is, https://sandbox-icp-api.bankopen.co/api/payment_token. You can also use POSTMAN for testing, the POSTMAN collection for payment token creation is, https://www.getpostman.com/collections/14fd333897d90c5ce3e1,  You don't have to use the UDF parameter when generating the request signature. 


Step 4: Once the integration is completed, the merchant can replace the live Key with Sandbox and replace the production URL instead of Sandbox URL. Refer to  For getting the sandbox API keys and credentials and Live API keys.


Step 5: Before using the live keys, the merchant has to click on “Activate Payment Gateway” from the Payment Gateway inside Integration section.

Android code

@Override
      public void onTransactionCompleted(final TransactionDetails transactionDetails) {
          runOnUiThread(new Runnable() {
              @Override
              public void run() {
                  String response = "On Transaction Completed:\n" +
                          "\n Payment Id: " + transactionDetails.paymentId +
                          "\n Payment Token Id: " + transactionDetails.paymentTokenId +
                          "\n Status: " + transactionDetails.status;

                  mTextViewResponseText.setText(response);
              }
          });
      }

      @Override
      public void onError(final String s) {
          runOnUiThread(new Runnable() {
              @Override
              public void run() {
                  mTextViewResponseText.setText(String.format("onError: \n%s", s));
              }
          });
      }

Remove Listener -

To remove listeners, you can invoke detachListener() after the transaction is completed or you haven’t to do with payment callbacks.

openPayment.detachListener()

conclusion:

Follow above steps to integrate in mobile app. If you are facing any issue please contact


For Integration kindly mail: mahendra@primeprogrammer.com

Also Provide

GST billing software

Stock Management software

Mobile application development

Payment Gateway Integration(core PHP, Laravel and Python)

Prime Programmer


    8795202855

Prime Programmer


Monday, July 6, 2020

Name validation check with alpha numeric using jQuery.

<div class="row">
        <div class="col-md-6 offset-md-3">
          <input type="textclass="form-control
placeholder="Full Namename="customer_name
id="customer_nameautocomplete="offrequired>
        </div>
      </div>


<script>
$('#customer_name').keypress(function(e) {
        var keyCode = e.keyCode || e.which;
        //Regex for Valid Characters i.e. 
Alphabets and Numbers.
        var regex = /^[A-Za-z0-9]+$/;

        //Validate TextBox value against the Regex.
var isValid = regex.test(String.fromCharCode(keyCode));
        if (!isValid) {
          return false;

        }

        return isValid;

      });

</script>

Price or Amount validation by jQuery is very easy


      <div class="row">
        <div class="col-md-6 offset-md-3">
          <input type="textclass="form-control"
  placeholder="Amount in INR
name="amountid="amount
autocomplete="offrequired ">
          
        </div>
      </div>

<script>

$('#amount').keypress(function(event) { if ((event.which != 46 ||
$(this).val().indexOf('.') != -1) &&
(event.which < 48 || event.which > 57)) { event.preventDefault(); } });

</script>


Number Validation with fixed count using jQuery


      <div class="row">
        <div class="col-md-6 offset-md-3">
          <input type="textclass="form-control"
 placeholder="Enter Contact No. Only
name="phoneid="phoneautocomplete="offrequired>
        </div>
      </div>


<script type="text/javascript">
      $("input[name=phone]").attr("maxlength", "10");
      $('#phone').keypress(function(e) {
        //if the letter is not digit then display
 error and don't type anything
        if (e.which != 8 && e.which != 0 && 
(e.which < 48 || e.which > 57)) {
          //display error message
          //$("#errmsg").html("Digits Only").show().
fadeOut("slow");
          return false;
        }

      });
</script>


Code run perfectly.

Any issue contact me

New Payment Gateway Of ICICI Bank Released(Bankonnect.co)


New Payment Gateway Of ICICI Bank Released(Bankonnect.co)

 
I have integrated new ICICI bank connect payment gateway for our client. It is too easy. integrate.

It's layer js is so interesting. 

PG Sandbox APIs for Bankonnect PG.

Following are the procedure


Step 1:  After Signup, the merchant can go on Bankonnect.co and generate the Sandbox Keys from the tab - Integration - Payment Gateways

Step 2: Go to docs.bankopen.com and  For generating the Request Signature, please refer to the documentation, https://docs.bankopen.com/docs/authentication,  "Authentication" and follow the steps for "Authorization header" which will be required for creating Payment token and once completed  go to "Payment Gateway" click on "Layer" and then click on “Layer Checkout” for the integration.  The Authorization header would be 'bearer ACCESS_KEY:REQUEST SIGNATURE'.  

Step 3: Once you click on Layer Checkout - you can start integrating "Layer.js" to creating the payment token, please refer to the documentation, https://docs.bankopen.com/reference#generate-token


The sandbox API for generating the payment token is, https://sandbox-icp-api.bankopen.co/api/payment_token. You can also use POSTMAN for testing, the POSTMAN collection for payment token creation is, https://www.getpostman.com/collections/14fd333897d90c5ce3e1,  You don't have to use the UDF parameter when generating the request signature. 

Step 4: Once the integration is completed, the merchant can replace the live Key with Sandbox and replace the production URL instead of Sandbox URL. Refer to  For getting the sandbox API keys and credentials and Live API keys.

Step 5: Before using the live keys, the merchant has to click on “Activate Payment Gateway” from the Payment Gateway inside Integration section.
Once MID is acquired and live, the user would be able to see the status under Integration - Payment Gateway as "Payment Gateway - Active"
For getting the sandbox API keys and credentials and Live API keys.

1. Please login to open dashboard click on Integration tab -next to client name go to settings- company profile - developer API 

2. In that Api key and access key you will get by clicking on generate it tab.

3. Also ensure whebook url which will be your source and redirection url on which you will get txn confirm message both update it and generate API key and Access key .


Call or what's app for Integration


Also Provide

GST billing software

Stock Management software

Mobile application development

Payment Gateway Integration(core PHP, Laravel and Python)


Prime Programmer

    8795202855

Prime Programmer


Outlook Email Configuration Service – Get Seamless Email Setup!

  Outlook Email Configuration Service – Get Seamless Email Setup! Setting up business emails (IMAP, POP3, SMTP) Troubleshooting email send...

Clock